The idea of a neat and clean home is easier to conceive but very difficult to deliver. One major problem comes when your socket sets are rolling all over in the drawers, and when you need a particular one, it is hard to find.
Have you tried making a homemade DIY socket organizer yet? If not, then you should definitely try it for a more organized drawer.
Some DIY Socket Organizer Ideas

Have you been trying different socket storing ideas? The one in which you try to arrange all the sockets horizontally to achieve proper sizes? If yes, you must have failed because if you arrange the sockets horizontally then there is not enough space in the drawer as this method consumes more space.
You might want to try the vertical storage method. But there is a big problem with that too! How would you see the size? Will you take out all in the row to find the right size when you need only one?
Probably you can go for a socket holder available in the shopping mart. It is a good way for socket storage but still not customized to your use. You might have a different set of socket sizes at home. Also, the numbers engraved on the ones available in market are in a very small font and difficult to read.
Go home, do some research and save your money. You would find less than $2 stuff at home with which you can make a customized socket organizer.
Best Way to Organize Sockets
Probably the best way to organize sockets is to make a customized socket holder according to your own need. Look into your drawer and find out the sizes you use most commonly.
Arrange them in a way so that next time you have a project, you don’t have to waste time on searching one socket out of hundred in a drawer.
Staying organized will make you efficient in your work. So, do these little home improvement things in your free time and you will discover how they save your precious time.
How to Make Wooden Homemade Socket Organizer
Yes, it is an awesome idea to make an excellent socket organizer at home. Look in your house and you will find half of the things that are required in there.
Just don’t let your sockets roll in the drawer anymore and try this step by step guide to make a wooden socket organizer which is totally affordable.
Step-1: Equipment and Materials
- 1/2″ thick 3″ x 9″ good condition poplar board
- 16″ of 1/2″ wide magnetic strip for magnet holder
- 1/4″ thick 2″ x 16″ walnut board
- 10 minute epoxy
- 150 grit sandpaper
- Wood glue
- Spray acrylic
- Saw
- Wood burning Kit (optional)
- Drill machine
Step-2: Design the Socket Holder

Image Credit: instructables.com
You will have to manually draw the various socket sizes that you use on the wooden board. You can include your children in this fun activity. And make them draw circles with a red pen of the size 0.02 inch more in size than your socket holders.
Make sure all the circles are marked in a horizontal line with a gap of 0.1 -0.2 inch in between them.
You have to continue the same circle drawing in horizontal lines throughout the width, taking care that you make circles corresponding to all the sizes you have.
After you are done, draw a rectangle around the socket circles. This is to give them a little more definition in the sea of circles on the board.
Step-3: Design the Base
Let’s move to the designing of the base. We are adding a magnetic strip in this one but you can also make this wooden holder without it. You have to start by copying the main body design to the base to get an idea of the width of sockets.
Now, two big black painted rectangles are to be drawn spanning from one end to other lengthwise. Actually it starts from the first circle and ends at last. These rectangles are made o.54 inch wide in accordance with the 1/2 inch wide magnets taken.
Step-4: Write the Sizes
You can do this step later as well. This is the main problem you will often have to face with those marketed socket holders so now you can write the socket sizes in bold and make them fairly big so that they are easily noticeable later.
You can do this with a blue pen. Write them on the side of the main body in correspondence with the circles drawn.
Step-5: Cut the Holes
Cutting time! Yes it sounds fun but keep your children away from it. First measure size and then Do it yourself with the drill, cut the holes and use saw for finishing.
Also make sure to carve rectangular areas on the bottom for the magnetic strips to fit in. These magnets give extra stability to the sockets and prevent them from moving within the socket hole.
Step-6: Sand App the Rough Edges
The base and the main body are made from different woods. This mainly serves to give it a better look as the two woods used are different in color. You can use a single type of wood board as well.
After cutting, you might have left rough edges and it is totally normal if you have. For a better finishing, you need to sand all the parts. You can do it with your hand or if you have a quick access to bench top belt sander, you can do it on the machine.
Step-7: Bold the Sizes
After you are done with sanding, the numbers you marked earlier depicting the socket sizes, are to be marked with highlighter now.
Sanding might have ruined your blue pen marking. You need to use a bold marker to do it now.
Step-8: Assemble all the Pieces
You will require epoxy for this purpose. Proceed with the base first and epoxy the magnetic strips and apply some pressure with your hand. Take care that you don’t stick any epoxy to your fingers.
After gluing the magnetic strips on base, roll the base over and put it against parchment paper for 5 minute and apply pressure. Then epoxy the other parts together.
Step-9: Sand Your Socket Holder
Your wooden socket holder is in your hands. Isn’t looking pretty? You still need to sand all the rough edges off and bring continuity between the base and the body.
Step-10: Polish it and Done
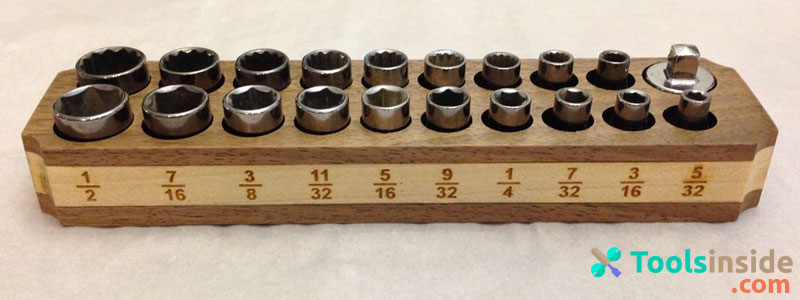
Image Credit: instructables.com
After you are done, polish it by coating it with a spray of polyurethane. You are good to go. Bring your sockets and arrange them inside. You will experience an unmatched joy after making your own homemade socket organizer.
Why so late? You have done a great job. Yes, you have made a wooden diy socket organizer. Keep your socket organize.
Also Read:
Leave a Reply